Zone Offense Flare: Beat 2-3 and 3-2 Zone Defenses with Smart Screens
Setup
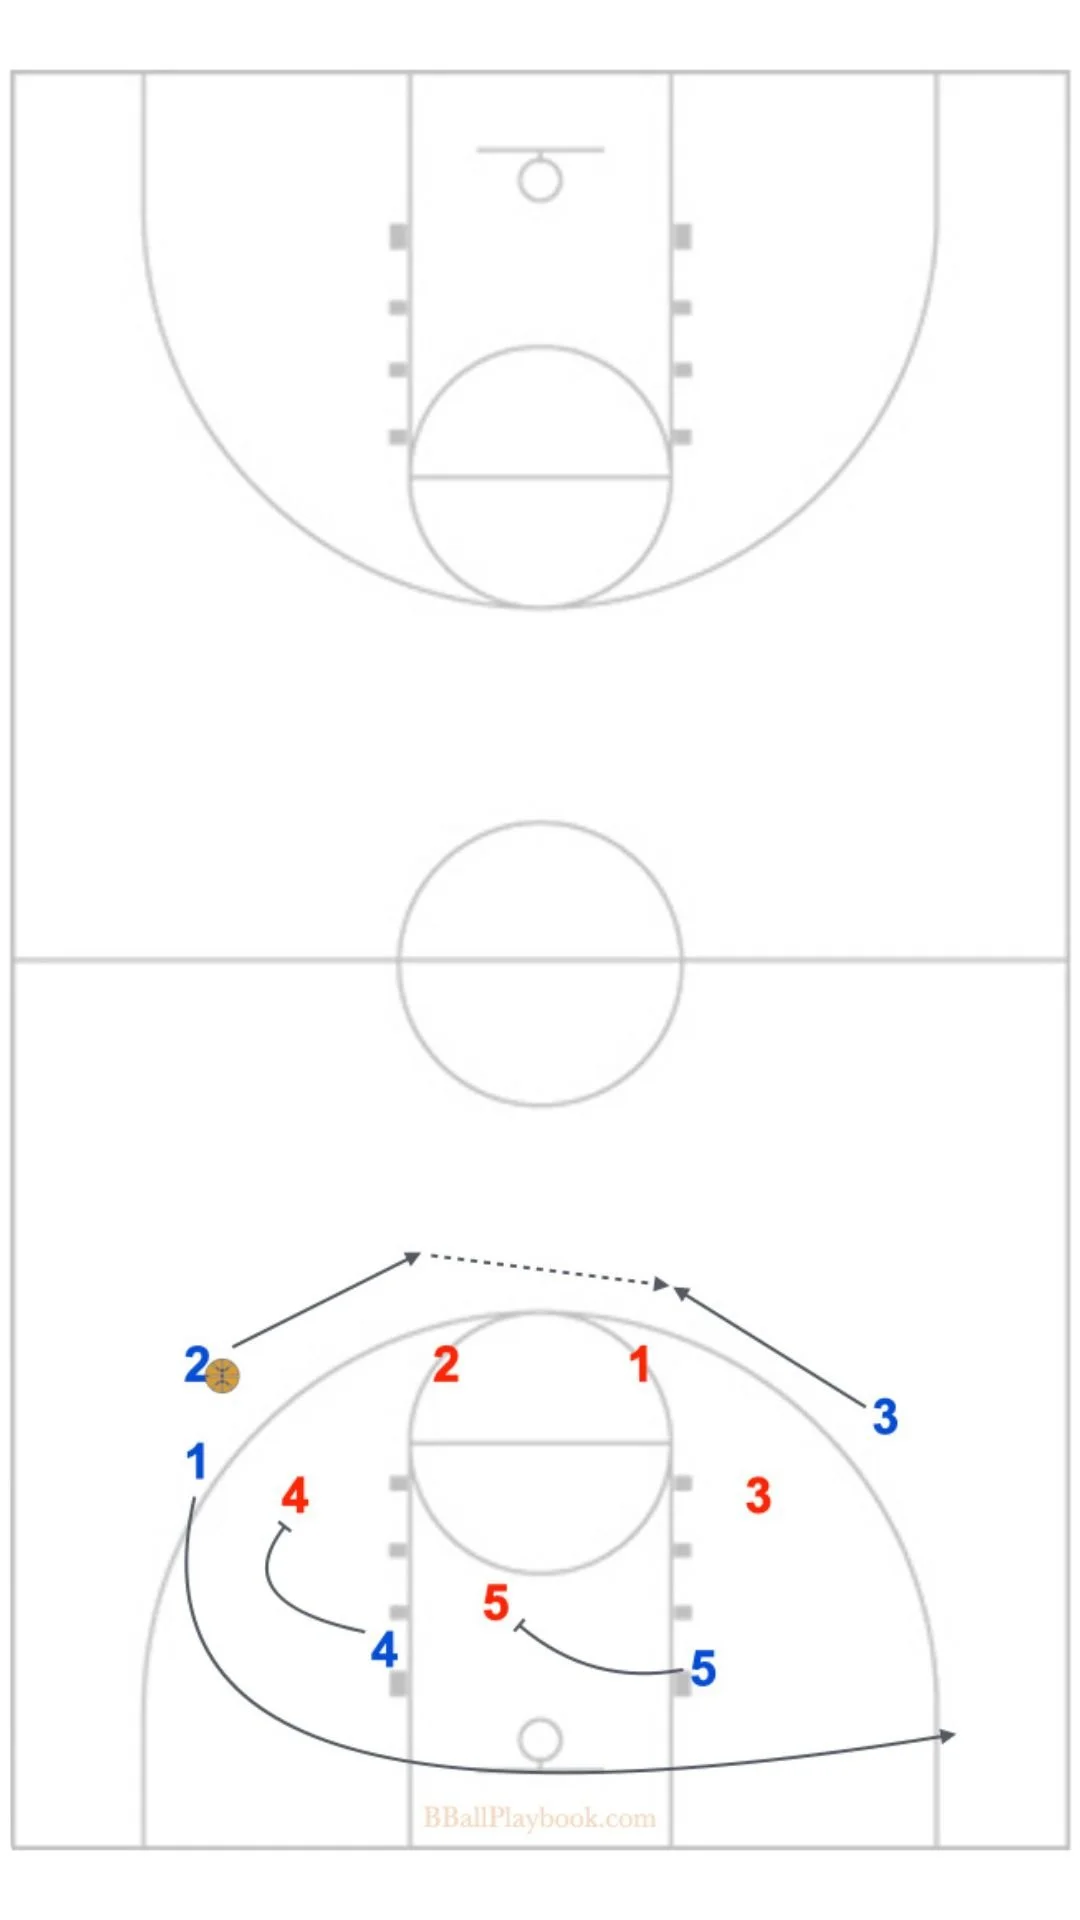
Begin in a 1-2-2 offensive formation.
Point guard (‘1’) has the ball up top.
Wings (‘2’ and ‘3’) are in both guard slots.
Post players (‘4’ and ‘5’) start near the blocks or elbows.
Execution
1 dribbles toward ‘2’ for a dribble handoff.
After receiving the handoff, ‘2’ dribbles toward the slot while ‘3’ fills the opposite slot.
‘2’ passes to ‘3’, initiating the next phase.
‘1’ runs off a stagger screen set by ‘4’ and ‘5’ toward the wing.
After screening, ‘4’ turns and sets an outside screen on the top zone defender (‘x2’), creating space for a flare.
‘4’ then slips into the middle of the zone, reading whether the defense overcommits.
‘3’ dribbles toward the middle, reading the defense to determine whether to hit the flare or the slip.
If x5 steps up, ‘4’ looks to pass to ‘5’ who dives behind the defense.
Coaching Points
Disguise the stagger and flare: ‘1’ should run hard off the stagger to sell the option.
4’s flare screen timing must be perfect, too early and the slip won’t be open; too late and the flare won’t work.
3 should use their eyes to mislead the defense. Look at ‘2’ on the flare to pull x2 out of the middle.
Players must understand their reads, who slips, who fades, and who’s the safety valve.


Full Breakdown for Coaches
Zone Play 5 – Flare/Slip is a masterclass in off-ball screen manipulation against zones. Designed by Ryan Schultz in the Hybrid Attack Offense, it takes advantage of zone coverage rules by forcing defenders into tough decisions.
Why Flare/Slip Works in Zone Offense
Zone defenses often rely on communication and positional discipline. This play stresses the top and wing defenders by combining a flare screen and a slip cut in quick succession. One defender must choose between stepping up on the flare or staying home to prevent a middle slip. Rarely can they do both effectively.
Key Reads
After the handoff: When ‘2’ hands the ball off and rotates the pass, the defense starts to shift. That’s the first window of opportunity.
As ‘1’ runs off the stagger, the zone shifts again—this helps pull weak-side defenders out of position.
When ‘4’ sets the flare for ‘2’, x2 (top defender) must commit to helping or risk an open shot.
The final misdirection is the slip by ‘4’, which puts pressure directly on the heart of the zone.
Teaching Flare and Slip
Coaches should teach flare screens with wide footwork and slips with explosive reads. Use breakdown drills in practice:
2-on-2 with a flare and slip option.
3-on-3 shell against the top of the zone.
“Eyes deceive” reps where passers look off defenders before passing.
Emphasize to your wings and guards:
“Make the defender guard two actions. If they hesitate, we score.”
Adapting Flare/Slip for Different Zones
Against a 2-3 zone:
This action draws out the top two defenders, leaving the middle soft. Perfect time for the slip from ‘4’.
Against a 3-2 zone:
Attack from wider angles. Run the flare action deeper and have ‘5’ stretch x5 with a backdoor seal or mid-post flash.
If the defense switches zones mid-possession, the continuity in this set allows you to flow into chin or staggered actions seamlessly.
Drills to Reinforce the Play
Drill 1: Flare & Slip Reads (3v3 Half Court)
Players rotate as flare screener, flare recipient, and slip option. A coach acts as defender x2.
Drill 2: Eyes-First Decision Making (Guard Work)
Stationary defender reacts to the passer’s eyes. If defender jumps, pass to slip. If defender stays, hit the flare.
Drill 3: 5-on-5 Simulation
Run full sequence of the play against live zone defense. Reward correct reads over makes.
Final Takeaways
Zone Play 5 – Flare/Slip is all about creating indecision in a structured defense. It uses smart movement and misdirection to open up multiple scoring options—whether it’s a flare jumper, a middle slip, or a drop to the baseline post.
This is an elite zone-beating action that scales well from youth teams to high-level varsity squads. With repetition and clear teaching points, your players can understand how to manipulate a zone—not just pass around it.
Commit to teaching it in layers:
DHO action timing.
Screen-to-screen transition.
Flare reads.
Slip recognition.
Final kickout awareness.
Master it. Drill it. Watch the zone break down.